Quinoa with Spinach and Mushrooms

Adapted from this recipe.

Yum.  This was a bit time-consuming because the quinoa, the greens and the mushrooms must all be cooked separately, but it was quite delicious and is healthy, almost in the extreme.  Quinoa is a very healthy grain-like vegetable (it is possible to eat the greens, as well, but they are, as of now, uncommon outside of South America) , very high in protein, iron and fiber.  It cooks very quickly and easily and has a nutty flavor and fluffy texture when cooked.  Its flavor is neutral enough to easily accept the flavor of whatever stocks or seasonings that it is cooked with, so it lends itself to practically unlimited preparations.  It is a great, gluten-free substitution for couscous or a healthier alternative to rice.  Look for it in the bulk section of your favorite store.  It is also getting popular enough that some stores are carrying it boxed, near the couscous and pasta and rice; look for a small, turquoisey-green box and know, in case you have to ask for it, that quinoa is pronounced “keen-wah.”

I intended to prepare this recipe as-is, but a lack of chard at my “everyday” grocery store, coupled with a whooping cough test (that’s a whole OTHER story) getting in the way of a planned, separate trip to the “gourmet” store to pick some up, caused me to go with an easy and already-on-hand Plan B:  spinach.  I just subbed a 10 ounce box of fresh baby spinach leaves for the chard and proceeded according to the recipe.  I must confess that I am positively dogmatic about mushrooms, so this recipe took me MUCH longer than someone who is less obsessive.  I LOVE thoroughly golden-brown mushrooms, so tend to only cook a dozen slices or so at a time, to insure that the mushrooms don’t crowd to much and soften instead of brown.  The process is intensively time-consuming, but the pay-off is indescribable.  If I ever open a pizza joint (who knows?  it could happen!), I will offer super-golden browned mushrooms as a topping option.  Too many times, when people cook mushrooms, they are more “steamed” than browned or sauteed.  There should NEVER be a collection of liquid in the bottom of the pan.  If there is, you’ve added to many to the pan at one time.  In my opinion.

This, in my opinion, is what properly browned mushrooms should look like (NOTE:  these are regular-old white, button mushrooms, so properly browned creminis will be even darker than this):

Note the golden-browned edges.  Not a bit of sogginess and NO liquid in the bottom of the bowl.  Mmm…somebody get me a fork.

So, back to the dish…

We all liked it.  It was quite good and something that I would readily eat again.  I love cremini mushrooms (which are the immature form of portabellas) and they give the dish a robust meatiness, even though it is completely vegetarian.  I used some vegetable stock, instead of water, to cook the quinoa, just to give a bit more flavor.  Quite nice.

Bananas Foster

Adapted from Southern Living September 2006

Absolutely delicious and startlingly easy.  Hubby has a serious and long-term rum aversion (thanks to a youthful over-indulgence on a long-ago trip to Belize), so I subbed Grand Marnier, instead, without incident.  Yum.  Use your own conscience to help you decide whether or not this is kid-appropriate.  Most kitchen scientists believe that a dish has to simmer for a long time (over 20 minutes) before the alcohol burns out completely.  It is likely, because of the short amount of time that this dish cooks after the booze is added, that there is still a significant portion of the original alcohol left.  The total amount of alcohol in the dish, however, is pretty small…less than a cup for 8 servings so less than 2 tablespoonfuls per serving, even if NONE of it cooked out.  I did serve this to my kids and they LOVED it, but I wouldn’t recommend serving it to very small children (or someone else’s children without their knowledge/permission), just to be safe.

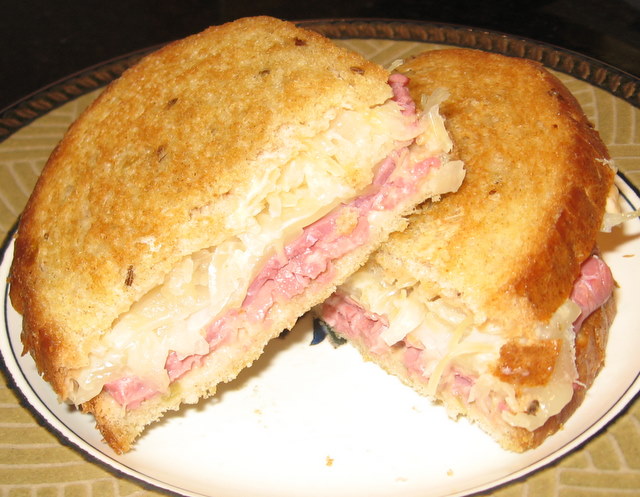
Reuben Sandwiches

I feel a bit silly even listing a recipe for these, but they’re one of Hubby’s favorite lunches, so I think they deserve a mention.  Hubby works from home, so we are frequently together for lunch.  This is something that we ONLY make when the kids are not around, because neither of them have the slightest interest in these, although we find them QUITE tasty.

Reuben Sandwiches (makes 2)

for sandwiches:

4 slices seeded rye bread

6 to 8 slices deli-sliced corned beef

3 to 4 slices Swiss cheese

about 1 cup sauerkraut

about 2 Tbsp butter

for dressing (you’ll have a little left over):

1/4 cup mayonnaise

1 Tbsp ketchup

1 Tbsp pickle relish

Mix together the dressing ingredients in a small bowl.  Lay out the bread slices and spread one side of them lightly with the dressing.  Top two of the bread slices with the cheese, then sauerkraut, then the corned beef, then top with the other two bread slices.  Heat a large skillet over medium heat and melt half of the butter in it.  Gently place the sandwiches into the skillet and cook until the bottom side is golden-crunchy.  Remove the sandwiches, temporarily, from the skillet and set aside.  Add the remaining butter to the skillet and then cook the sandwiches on the other side.  When the second side is golden-toasted, remove the sandwiches from the skillet, cut in half and enjoy.

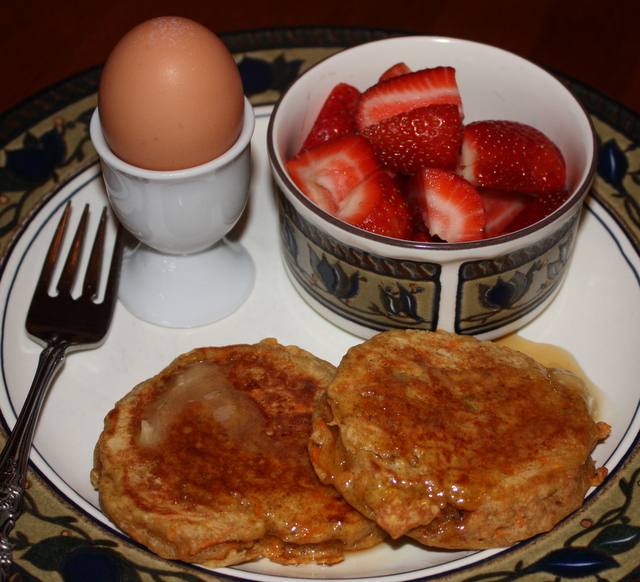
Carrot Cake Pancakes

Recipe here.

Yum, yum, yum.  A definite keeper.  I always seem to find myself with a bit of leftover buttermilk.  I have a few recipes that use it but none of them use the whole container, so I’m always on the lookout for recipes that will use up the last little bit.  This is a great one.  Nutty and sweet, but just healthy enough to make you feel virtuous.

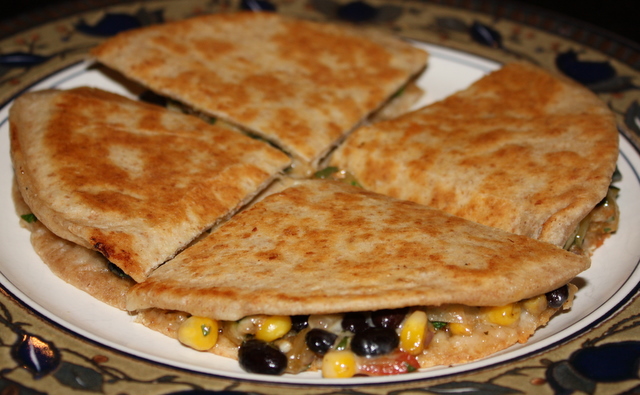
Zucchini, Black Bean and Corn Tacos or Quesadillas

Quesadillas

Tacos

Zucchini-Corn-Black Bean Filling:

a few Tbsp of vegetable oil

3 cups frozen corn kernels, thawed and drained

3 large zucchini, diced

1 cup finely chopped onion (red or white, your choice)

3 cloves garlic, pressed or minced

2 cups roughly chopped fresh tomato (optional)

1 can black beans, rinsed and drained

Other ingredients:

Wheat tortillas (I *LOVE* the whole-wheat ones from Central Market.)

Your choice of cheese:  queso fresco, Monterey Jack, cheddar, Colby-Jack, etc. , grated or crumbled

Your choice of other (optional) garnishes:  sour cream, chopped cilantro, fresh or canned jalapenos, guacamole, salsa, etc.

Pour about 1 Tbsp oil into the bottom of a large skillet and swirl the pan to lightly coat it.  Heat over high heat, then add the corn.  Cook the cook for about 5 minutes, stirring occasionally, until the corn is warmed through and has some slight charred marks on the edges.  Season with a tiny bit of salt.  Remove the corn from the pan and set aside.

Add a bit more oil to the pan and repeat this same process with the zucchini.  Remove from the pan and set aside.

Add a bit more oil to the pan and the add the onion.  Cook the onion, stirring, until is it totally softened and starting to caramelize, about 5 minutes.  Add the garlic and cook, stirring, for one more minute.  Add the tomatoes and cook for about 5 more minutes.  Return the corn and zucchini to the pan and stir.  Gently stir in the rinsed and drained beans and cook another minute or two, until filling is warmed through.

If you’re making tacos, spoon the warm filling into the tortillas.  Top with cheese and your choice of garnishes and serve.

If you’re making quesadillas, warm a very large, flat-bottomed pan or a griddle over medium-high heat and melt a little bit of butter onto it and spread it around to lightly coat the cooking surface.  Place one tortilla on the pan (or griddle) and sprinkle a bit of cheese over it, trying to keep the cheese on the tortilla, rather than into the pan (watch your fingers!).  Top the tortilla with a generous layer of the zucchini/black bean/corn mixture.  Top with another small layer of cheese and a second tortilla.  Cook, adjusting the heat as necessary to insure that the cheese melts and the filling stays warm, until the bottom tortilla is golden brown.  Quickly spread a very thin layer of softened butter on the top tortilla.  Carefully flip the quesadilla and repeat the cooking process until the tortilla that is now on the bottom is golden brown and starting to lightly crisp up.  Remove the quesadilla from the pan and cut into wedges.  Top with your choice of garnishes and serve immediately.

This was VERY yummy and fairly healthy.  A hit with the carnivores, but completely vegetarian.  The quesadillas can make a great healthy snack, if cut into wedges and shared, but are hearty enough to be a filling meal.

The quantities are very flexible, according to your taste.  Around here, omelets and quesadillas are a great way to use up any leftovers that we might have on hand.  Don’t like tomatoes?  Leave ’em out.  Have a bit of leftover spinach? Throw it in.  Want to add some chicken?  Do it.  Like it spicier?  Add some minced fresh jalapenos or serranos to the filling.  Cilantro?  Go for it.  You really can’t mess this up.

The only “MUST” is that you need to make sure that the corn is completely thawed before you cook it to be sure that it gets a tasty char on it.  You can nuke it and then drain it, if you need to, but just be sure that it’s thawed and not soaking a lot of liquid.

# of servings will vary, according to how much filling you put into your taco or quesadilla, but we used two tortillas per person (an adult “serving” is one quesadilla or two tacos) and had plenty of filling to feed four hungry people, with a bit left over for lunch the next day.  We used approximately 1/4 cup of cheese per person.  Your mileage may vary.

Herb Crusted Lamb Chops and Crispy Kale

This was SO yummy.  This photo makes the lamb look too “rosy” and a bit greasy and the kale looks weird and too dark, but trust me, this was much tastier than it looks and was surprisingly easy.  The kale recipe is hereThe potatoes I’ve covered MANY times before.  The lamb recipe follows:

Herb-Crusted Lamb Chops

1 rack of lamb   (about 2 pounds or 7 chops, with the bones frenched* and excess fat trimmed off)

1/2 cup fresh bread crumbs

1 finely chopped shallot

1/2 Tbsp finely chopped fresh basil

1/2 Tbsp finely chopped fresh thyme

1/2 Tbsp finely chopped fresh Italian parsley

salt and freshly ground black pepper

1 and 1/2 Tbsp olive oil

1 Tbsp chicken stock

Preheat oven to 450 degrees.  Place the lamb in a roasting pan, bone side down and fat pad up and roast for about 20 minutes or until a meat thermometer inserted into the thickest part of the lamb (away from the bone) reads 135 degrees.

While the meat is roasting, combine the bread crumbs, shallots, herbs, olive oil, chicken stock and a pinch each of salt and pepper in a small bowl.

Preheat the broiler.  When the lamb is done roasting, spread the bread crumb/herb mixture evenly over the meat side of the lamb rack.  Place the lamb under the broiler (about three inches from the heat) and broil until lightly browned (3 minutes?)  Be careful that the crumb coating doesn’t burn.

Transfer the lamb to a serving platter and cut between the bones to separate it into chops for serving sizes.  Serve immediately.

* Your butcher will trim the fat off and french the bones for you, if you ask.  I left the “fat pad” on to baste the meat as it roasted (then just eat around it when you eat the chops), but that’s personal preference.  Feel free to cut it off, too, for a prettier presentation.

Update:  Here’s an even better set of lamb rack preparation instructions:

http://www.seriouseats.com/2010/04/how-to-clean-and-french-a-lamb-rack.html

Giada’s Sweet Pea Crostini

Recipe here.

I made this recently on a lazy afternoon at home, when we had eaten a large, late breakfast and had a nice dinner planned, so we didn’t feel like a full lunch.  It made a perfect light and relatively healthy snack to tide us over until dinner..  The kids even liked it and the ingredients are all things that are easy to keep on hand, so it would make a great last-minute hors d’oeuvre for unexpected guests.  This would work with almost any kind of bread (I used a country loaf and just cut each slice in half to make each piece smaller) and wouldn’t HAVE to be baguette.  We have mint growing in our yard, so we always have it on hand, but if you didn’t have any and chose to leave it out, it wouldn’t be the end of the world.  I left the prosciutto off the top, because it was a last-minute thing and I didn’t have any, but it would have been nice.  A little cooked, cooled and crumbled bacon would be nice, too.  Or, you can go vegetarian, as I did, and cook the peas in vegetable stock, rather than chicken stock.  Yum.