Another one that I made a long time ago and never got around to posting, but it was very good. Great for an after-school snack. Recipe here.
Category: Snacks
Broccoli Quiche with Gruyere and Cheddar
Yum. I overcooked the quiche a tiny bit and got the egg a bit overbrowned, but this was still quite tasty. A hit with all 4 of us. Recipe (by the wonderful Kerry Saretsky) here.
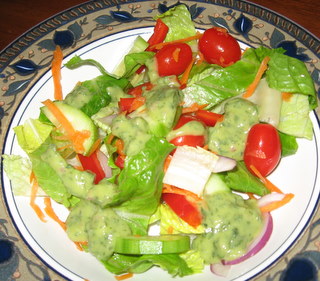
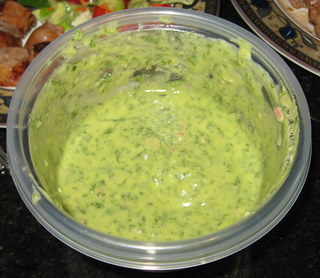
Green Goddess Salad Dressing
At the risk of overusing an obnoxious “foodie” word, I must say, about this dressing: nom nom nom.
Quite delicious. A little time-consuming, but worth the effort and the recipe (which can be found here) makes a generous amount.
Bean Toasts with Herbs and Eggs
(Please forgive the blurry camera phone photo…my camera has broken recently, but a wonderful new anniversary gift holds the promise of improved photo quality on this blog…as soon as I figure out how to use it!)
This dish is very delicious, very easy and very good for you!
This is a wonderful, high-protein dish to start the day off with. Yum. It’s been a few weeks since I made this and it looks so good, I think I’ll plan to make it again very soon.
Recipe here.
Gougeres
Absolutely delightful little bites of cheesy heaven. Filled with butter and cheese, they are decadently sinful. These things are both ridiculous and sublime. Ridiculously sublime. Virtue and vice together. Seriously. Just make them.
The recipe that I used is from the September 2009 issue of Wine Spectator magazine, but their website is subscription-only (how rude!,) so I can’t link to it directly. This recipe is the closest that I’ve seen. If you cut the amount of gruyere by a couple of tablespoons and substitute a couple of pinches of cayenne for the black pepper, you’re pretty much there. When I made mine, I added a little freshly minced sage, which was good, but maybe just a TINY bit too much. I will cut back a little next time. Parsley or thyme would also be delicious, but tread lightly. It’s easy too overdo it.
These are fabulous as an appetizer with a good glass of red wine, or, with dinner, in place of bread or rolls. The recipe is from Chef Terrance Brennan, of New York’s Artisanal, where Girl and I were lucky enough to have brunch with my mother last month. We had some of the gougeres there and they were fabulous, but this recipe is simple enough to recreate that they were just as good at home. The secret is really good quality cheese and eating them immediately fresh and warm out of the oven.
Girl at Artisanal, with a GIGANTIC cup of hot chocolate.
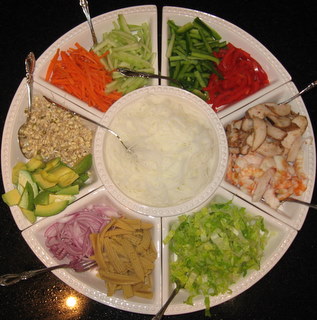
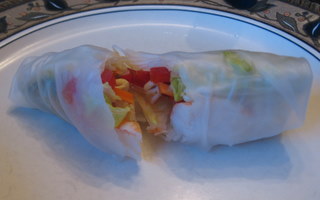
Spring Rolls
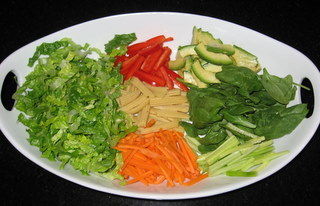
Clockwise from top right: julienned red and green bell pepper, thinly sliced teriyaki chicken and halved grilled shrimp, shredded lettuce, sliced baby corn and red onion, avocado and bean sprouts (which I grew myself! how’s that for advanced meal planning!), julienned carrot and cucumber. Rice noodles in round center section.
This was an experiment, but has become a favorite family meal. Everyone loves to be able to customize and assemble their own meal and make it EXACTLY how they like it and it’s exceedingly healthy and low fat. This is a VERY popular meal with the kids. I usually am the person that’s on “wrapper duty” and make sure that there’s always a new wrapper soaking in the hot water, so that there’s one ready when someone needs it. We usually can eat at least three per person.
Basically, it can be anything that you like:
julienned or thinly sliced veggies: cucumber, bell pepper, carrot, lettuce, red onion, avocado
bean sprouts, baby corn, baby spinach
teriyaki-marinated grilled shrimp and/or chicken
thin rice noodles: I cut these into smallish pieces with kitchen shears and put them in a heatproof bowl. Pour boiling water over them (I use an electric kettle) and let them soak a few minutes until they’re softened. Drain before placing in your serving bowl.
Assemble all of the ingredients and fillings on a platter, in whatever configuration you choose.
Pour more boiling water (again, I use an electric kettle and keep refilling it, so that we can dump out the water and replace it as it cools during the meal) into a shallow and wide, heat-proof bowl (I use the salad bowl of my everyday stoneware.) Place one rice paper spring roll wrapper into the hot water at a time and let it soak to soften for a few seconds (10-15.) Remove quickly (using a fork or small tongs, if necessary, to avoid a burn) and place on your plate. Fill the wrapper with veggies or proteins of your choice and wrap up like a burrito. The rice paper will stick to itself and seal your spring roll. Two important tips:
1. Place the fillings in a tight, compact line about 1 and 1/2 inches wide, just off the center of the wrapper, stopping at least an inch away from each edge.
2. Gently compress the fillings as you roll up the wrapper, to make the roll as tight as possible. This will help it stay intact as you eat it. No worries, though, if your roll does come apart…just grab a fork!
Serve with your choice of sauces (duck sauce, soy sauce, my great homemade sauce recipe here) for dipping and maybe edamame on the side. Oh, and some riesling!
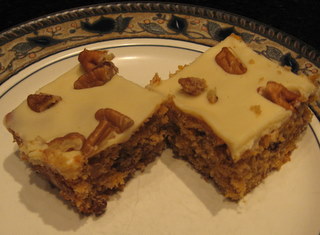
Orange-Pecan Tea Bread
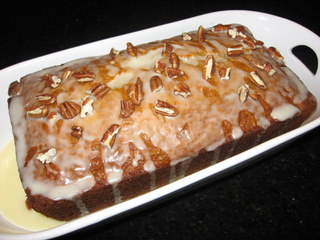
Orange-Pecan Tea Bread from Cooking Light magazine.
Recipe here.
Really easy and delicious.
Wrap leftovers well and finish them off quickly, as the texture of the bread suffers after a day or two.
Back-to-School Raspberry Granola Bars
These bars, from Food & Wine magazine, are OUTSTANDING. They are loaded with fiber and the pecans add a little bit of protein. They do have a fair amount of fat (butter) and sugar, but aren’t as bad as some cookie/bar recipes. We LOVED it with the raspberry preserves, but it would also be great with grape, blackberry, blueberry or any other robustly-flavored preserve or jelly. I have a little bit of dulce de leche left over from another recipe and I’m tempted to make a batch with that…we’ll see!
The butter in these bars can go rancid/stale tasting pretty quickly, so I would refrigerate or freeze them if you’re not going to eat them all in 3 or 4 days. The recipe says 1 week, but I think that’s a bit of a stretch. I LOVE the little tang of saltiness that an entire teaspoon of kosher salt provides, but if you are very sensitive to salt, you might want to cut back a little.
Pumpkin-Nut Doughnuts
Pumpkin-Nut Doughnuts
For doughnuts:
2 3/4 cups flour
2/3 cups almond flour (finely ground almonds)
3 tsp. baking powder
1 1/2 tsp baking soda
1 tsp cinnamon
1 tsp freshly ground nutmeg
1/2 tsp ground ginger
1/8 tsp ground cloves
1 1/2 tsp salt
1/2 cup pumpkin puree
1/4 cup whole milk
2 heaping Tbsp sour cream
heaping 1/2 cup sugar
2 eggs
1/2 stick melted butter
For cinnamon-sugar coating:
1 heaping cup sugar
1 tsp ground cinnamon
In a large bowl, mix together the flour, almond flour, baking powder, baking soda, cinnamon, nutmeg, ginger, cloves and salt.
In a medium bowl, stir together the pumpkin, milk, sour cream, sugar, eggs and melted butter. Gently stir this mixture into the dry ingredients until it begins to hold together as a soft, sticky dough. It’s OK if it’s a bit lumpy.
Turn the dough out onto a lightly floured surface and knead just until you have a smooth dough. Sprinkle a little more flour over the top of the dough and roll it out to a 1/2 inch thickness. Using a doughnut cutter (or two round cookie cutters – one about 1 inch across and another about 4 inches across,) cut out the doughnuts and put them on a cookie sheet dusted with some flour.
Pour at least 2 inches of canola oil into a large, deep frying pan and heat it over high heat until it reaches 375 degrees (this takes a while!) Fry about 4 to 5 doughnuts at a time, depending upon the size of the pan. Do not crowd the pan. The doughnuts will sink to the bottom of the oil, then float back up to the top. When they float to the top, turn them over and cook them for another 1 to 2 minutes until uniformly browned. Be careful not to overcook them.
Fry the doughnut holes separately, watching them carefully, as they will cook VERY quickly.
Drain the doughnuts and holes on paper towels for a moment and then, while still hot, coat them with the cinnamon sugar. Coat the doughnuts a few at a time, as they come out of the oil, rather than waiting to coat them all at the same time.
Yummy spices!
Martha Stewart’s Citrus Sugar Cookies
As I have mentioned before, I am a sucker for anything citrus-y. I would choose a good lemon meringue pie or lemon bar over the fanciest chocolate dessert any day, so when I saw this recipe on Martha Stewart’s website (*), I knew that I had to try these.
These were absolutely DELICIOUS. The citrus flavor is nice and tangy, but still subtle enough for this to be a SUGAR cookie, not a LEMON cookie. This is the easiest dough to work with that I’ve ever seen in my life; it was smooth and soft, without being sticky at all.
The ice cream scoop directions made it VERY simple. My scoop may be a little bigger than Martha’s, though, because I ended up with only 24 cookies, rather than the 30 that she yielded. Actually, if I make these again, I will use a smaller scoop (1 inch?) and bake them for a few minutes less, because using the bigger scoop yielded massive, monster cookies almost 4 inches across (fun for a party or event, but a little big for an everyday treat.) The one good thing about the larger size, though, is that it gives more of the chewy cookie interior, while a smaller cookie would provide more of the crunchier exterior.
I’m not exactly sure about why the directions say to brush the unbaked cookies with water, but I did it and they turned out well, so why mess with a good thing? I used citrus-colored (orange, green, yellow) sanding sugar on a couple of them, just for grins. The water made an interesting glaze-y design on those cookies that wasn’t evident on the ones with the clear/white sanding sugar (I used coarse sugar, because that’s what we typically like on muffins, etc.)
* I came across the recipe because I bought some Boyajian lemon oil to make these cookies and was looking for other recipes that would call for it.
Pondering a purchase of the citrus oils, but not sure whether or not it’s worth it? If you love to bake and either LOVE citrus as I do or love experimenting with all different flavors, then you MUST buy them (you’ll need the orange oil for when I post my chocolate-orange truffle recipe soon). If you’re not a big baker, you may not find enough uses for the oils to justify the money and effort to buy them. They are a little hard to find, even in Austin, however you can order them directly from Boyajian’s website. Locally, the only place that I’ve found the 3-oil set (3 small bottles that will last a LONG time for about $10: one lime, one orange and one lemon) is at Sur la Table in The Domain. Central Market sometimes has the lemon and orange, sold individually, but does not carry the lime oil. Williams-Sonoma used to carry them, but no longer does.
A couple of the recipe commenters on Martha’s site complained about the fact that Martha specifies “drops” of oil, but the bottles don’t come with droppers. Check around at a craft store (or possibly even a drugstore?) for small little eyedroppers that can be washed and reused. Make sure to clean them thoroughly, if they’re plastic (a glass one is even better, if you can find one), because the citrus oils are VERY strong and acidic and can actually melt plastic (think about it – this oil is the active ingredient in those cleaners like Citra-solve, etc…it’s STRONG STUFF!)

